All eye shadows used for this look were from Urban Decay's sustainable eyeshadow box.

I started of by using Niveas everyday moisturiser,using a moisturiser as your base is a good way to help your make-up last longer if you don't use a primer. I applied Bourjois 10 hour sleep effect foundation with a Mac 190 brush. This foundation blends so easily, and really does last longer than most other drug store brands. I then used Mac studio fix concealer under the eyes and on any blemishes, to create a flawless complexion.

I decided not to use any wax on the brows or to fill them in as I wanted a more natural look, and for the eyeshadows to stand out the most.
To start of with I used Benefits High brow to define the brow arch

Before applying any eyeshadow I applied Urban Decay's Primer Potion as a base to make sure the eyeshadow lasted.

The first eyeshadow I used was Half baked,a very vibrant gold. I applied this all over the eye lid and blended upwards into the crease


and then mixed it with twice baked, going back over the crease and blending upwards to give more definition


Using Revlon's eyeliner pencil in sueded brown i lined the top of the lid, this pencil comes with a blending brush on the other end, so i used that to soften the liner.

I then applied two coats of the NYC sky rise lengthening mascara. This mascara is great if your going for a more natural look as the brush in quite small and uses a minimal amount of the product meaning the lashes don't get clumpy
I then used false lashes to really make the eyes stand out. The ones I used were very spaced out instead of full thick ones and were drug store lashes for around £3. After I applied the lashes I went over the lash line with Rimmels liquid liner to get rid of any glue marks.

To finish off the face i applied Benefit's Hoola bronzer all over the face, and instead of using a blusher I added more bronzer to the cheek bones and the top of the forehead.

I added Benefit's Moon Beam to the top of the cheekbones, under the brow bone and under the nose. This looks really pretty on pictures as it shows where the light hits your face

To finish off I used Gosh lipgloss in 107 which is a really pretty light pink.

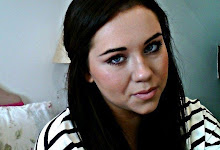
Finishing look


0 comments:
Post a Comment